Encrypt email messages
When you need to protect the privacy of an email message, encrypt it. Encrypting an email message in Outlook means it’s converted from readable plain text into scrambled cipher text. Only the recipient who has the private key that matches the public key used to encrypt the message can decipher the message for reading. Any recipient without the corresponding private key, however, sees indecipherable text. Outlook supports two encryption options:
- S/MIME encryption – To use S/MIME encryption, the sender and recipient must have a mail application that supports the S/MIME standard. Outlook supports the S/MIME standard.
- Microsoft 365 Message Encryption (Information Rights Management) – To use Microsoft 365 Message Encryption, the sender must have Microsoft 365 Message Encryption, which is included in the Office 365 Enterprise E3 license.
IRM protection should not be applied to a message that is already signed or encrypted using S/MIME. To apply IRM protection, S/MIME signature and encryption must be removed from the message. The same applies for IRM-protected messages; users should not sign or encrypt them by using S/MIME.[/vc_column_text]
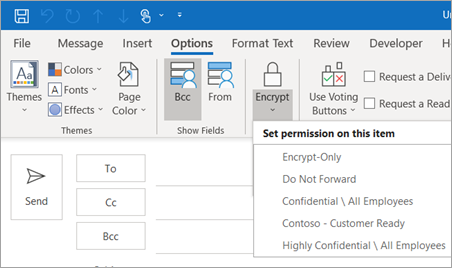
Encrypt button and updates to email encryption
With the update in Office, email encryption in Outlook got even better.
 |
- The Permissions button


- The Encrypt button contains both encryption options (S/MIME and IRM). The S/MIME option is only visible if you have an S/MIME certificate configured in Outlook.For detailed instructions on adding encryption, check Encrypting with S/MIME or Encrypt with Microsoft 365 Message Encryption.
Encrypting with S/MIME
Before you start this procedure, you must first have added a certificate to the keychain on your computer. Once you have your signing certificate set up on your computer, you’ll need to configure it in Outlook.
- Under the File menu, select Options > Trust Center > Trust Center Settings.
- In the left pane, select Email Security.
- Under Encrypted email, choose Settings.
- Under Certificates and Algorithms, click Choose and select the S/MIME certificate.
- Choose OK
- If you are an Office Insider with Microsoft 365 subscription, here’s what is new to you:In an email message, choose Options, select Encrypt and pick Encrypt with S/MIME option from the drop down,You’ll see an Encrypt with S/MIME if you have an S/MIME certificate installed on your computer.For Outlook 2019 and Outlook 2016,In an email message, choose Options, select Permissions.
- Finish composing your email and then choose Send.
Encrypt with Microsoft 365 Message Encryption
- If you are a Microsoft 365 subscriber, here is what is new to you:In an email message, choose Options, select Encrypt and pick the encryption that has the restrictions you want to enforce, such as Encrypt-Only or Do Not Forward.
Note: Microsoft 365 Message Encryption is part of the Office 365 Enterprise E3 license. Additionally, the Encrypt-Only feature (the option under the Encrypt button) is only enabled for subscribers (Microsoft 365 Apps for enterprise users) that also use Exchange Online.
- For Outlook 2019 and 2016,In an email message, select Options > Permissions and pick the encryption option that has the restrictions you’d like to enforce, such as Do Not Forward.
Encrypt a single message
- In message that you are composing, click File > Properties.
- Click Security Settings, and then select the Encrypt message contents and attachments check box.
- Compose your message, and then click Send.
Encrypt all outgoing messages
When you choose to encrypt all outgoing messages by default, you can write and send messages the same as with any other messages, but all potential recipients must have your digital ID to decode or view your messages.
- On the File tab. choose Options >Trust Center > Trust Center Settings.
- On the Email Security tab, under Encrypted email, select the Encrypt contents and attachments for outgoing messages check box.
- To change additional settings, such as choosing a specific certificate to use, click Settings.