Call us: (08)9200 6145
support@healthypc.com.au
HealthyPC – KnowledgebaseHealthyPC – KnowledgebaseHealthyPC – KnowledgebaseHealthyPC – Knowledgebase
  • Home
  • About
  • Services
  • Support
    • Help Centre
    • Online Forms
    • Downloads
    • Speed Test
    • Service Status
  • Contact

Microsoft Edge – Create a Profile

  • Help Centre
  • WPHelpere
Table Of Contents
Create a Microsoft Edge Profile that can sync your browser data across multiple devices!

Create a Microsoft Edge Profile that can sync your browser data across multiple devices!

Open Microsoft Edge from your Start menu or desktop

Select the User Icon in the Right-hand Corner.

Select the Add New account, and select the Sign in to sync data button

Enter Your Office 365 Login Credentials and Multifactor Codes

Once logged in, you will see You’re all set! Select the Done button.

Select Yes To All apps

You are now signed into your Profile with Microsoft Edge

This will sync your history, bookmarks and more.

#365, 365 Edge, Edge, Microsft edge, office 365, Profile
Like Dislike
9 views
Table Of Contents
Step 1: Access Outlook on the Web
Step 2: Locate the Online Archive
Step 3: Manually Delete Unnecessary Emails
Step 4: Empty Deleted Items Folder
Step 5: Set Up Retention Policies (Optional)
Step 6: Use ‘Clean Up’ Tool for Additional Cleanup (Outlook Classic)
Step 7: Monitor Archive Mailbox Size
Additional Tips

Step 1: Access Outlook on the Web

  1. Open your web browser and navigate to https://outlook.office.com.
  2. Sign in using your Microsoft 365 credentials.


Step 2: Locate the Online Archive

  1. In the left-hand folder pane, scroll down to find In-Place Archive – [Your Name] or Online Archive.

  2. Click on it to view the archived folders and emails.​

Note: The Online Archive is a separate mailbox that stores older emails, helping to keep your primary mailbox uncluttered.


Step 3: Manually Delete Unnecessary Emails

  1. Within the Online Archive, browse through the folders to identify emails you no longer need.

  2. To delete an email:

    • Right-click on the email and select Delete.

    • Or, select multiple emails by holding down the Ctrl key (or Cmd on Mac), then press the Delete key.​

Tip: Regularly deleting unnecessary emails helps maintain optimal storage usage.

​


Step 4: Empty Deleted Items Folder

  1. After deleting emails, they move to the Deleted Items folder within the Online Archive.

  2. To permanently remove them:

    • Right-click on the Deleted Items folder.

    • Select Empty folder.​

Caution: Once emptied, these emails cannot be recovered. Ensure you no longer need them before proceeding.

​


Step 5: Set Up Retention Policies (Optional)

If you want emails to be automatically deleted after a certain period:​

  1. Right-click on a folder within the Online Archive.

  2. Select Assign policy.

  3. Choose a retention period (e.g., Delete after 1 year).​

Note: Retention policies help automate the cleanup process by deleting emails older than the specified period. ​


Step 6: Use ‘Clean Up’ Tool for Additional Cleanup (Outlook Classic)

Outlook offers a ‘Clean Up’ tool to remove redundant messages in email threads:

  1. Go to the Home tab.

  2. Click on Clean Up.

  3. Choose from:

    • Clean Up Conversation

    • Clean Up Folder

    • Clean Up Folder & Subfolders

Tip: This tool helps reduce clutter by removing duplicate messages in conversations.

​


Step 7: Monitor Archive Mailbox Size

To check the size of your Online Archive:

  1. Click on the Settings gear icon.

  2. Select View all Outlook settings.

  3. Navigate to General > Storage.​

Note: Monitoring your mailbox size ensures you stay within storage limits and maintain optimal performance.

​


Additional Tips

  • Regular Maintenance: Schedule periodic cleanups to prevent storage issues.

  • Be Cautious: Always double-check before deleting emails to avoid losing important information.

  • Seek Assistance: If unsure about any step, please contact the support team.

  • App/Web​: For faster results its recommended to use Outlook Web to complete the above steps.

#archive, archive almost full, archive full, email archive, email storage, microsoft 365, office, office 365, Outlook, storage
1 Dislike
19 views
Table Of Contents
Step 1: Access Outlook on the Web
Step 2: Locate the Online Archive
Step 3: Manually Delete Unnecessary Emails
Step 4: Empty Deleted Items Folder
Step 5: Set Up Retention Policies (Optional)
Step 6: Use ‘Clean Up’ Tool for Additional Cleanup (Outlook Classic)
Step 7: Monitor Archive Mailbox Size
Additional Tips

Clear the AutoComplete list

Use one of the following two methods to delete the AutoComplete list.

Method 1

1 Open Outlook.

2 On the File tab, select Options.

3 Select the Mail tab.

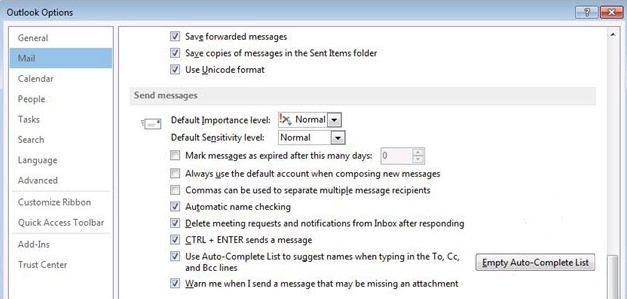
4 Under Send Messages, select Empty Auto-Complete List.

Screenshot of the Outlook Options window that shows the Empty Auto-Complete List button.

5 Select Yes.

Method 2

Start Outlook by using the /CleanAutoCompleteCache switch.

1 Select Start, and then select Run.

2 Type Outlook.exe /CleanAutoCompleteCache.

Note: If Outlook is not installed in the default location, you must point to the path of Outlook.exe.

Like Dislike
17 views
Table Of Contents
Enable the AutoComplete feature

Enable the AutoComplete feature

To access the AutoComplete setting, follow these steps:

1 On the File menu, select Options.

2 Select the Mail tab.

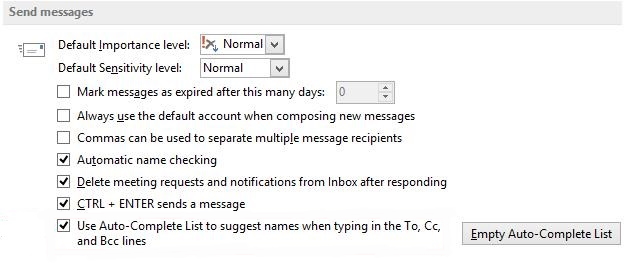
3 Scroll approximately halfway down until you see Send messages. Make sure that the Use Auto-Complete List to suggest names when typing in the To, Cc, and Bcc lines box is checked.

Screenshot of Send messages window, and the option Use Auto-Complete List to suggest names when typing in the To, Cc, and Bcc lines box is checked.

Like Dislike
2 views
Table Of Contents
Remove AutoComplete list entries one at a time

Remove AutoComplete list entries one at a time

Microsoft Outlook maintains the AutoComplete list. The list is used by both the automatic name-checking feature and the automatic completion feature. The AutoComplete list, also known as the nickname cache, is generated automatically when you send email messages from Outlook. The list contains SMTP addresses, LegacyExchangeDN entries, and display names for people to whom you have sent mail previously.

Note: The AutoComplete list for Outlook is specific to Outlook and is not shared with Outlook on the web. This app maintains its own AutoComplete list.

Follow these steps:

1 Open a new email message.

2 Type the first few characters of the AutoComplete entry that you want to remove.

3 When the entry appears in the list of suggestions, move your mouse pointer over the suggestion until it becomes highlighted, but don’t select it.

4 When the X icon appears next to the highlighted suggestion, select X to remove the entry from the list, or press the Delete key on the keyboard.

5 Selecting X will prevent that name entry from appearing in the AutoComplete list again but won’t remove it from your account. This entry may still appear in other areas in Outlook (such as search boxes).

Note: If you send a person a new email after you’ve removed their name from the AutoComplete list, their information will be restored to the list.

Like Dislike
2 views
Table Of Contents
How to Set / Change Your Default Outlook Email Account

How to Set / Change Your Default Outlook Email Account

Typically the first email account set within your Outlook account is activated as your Default email account for sending emails. Sometimes due to business requirements, this might need to be changed to an email account that is shared with other users e.g an info@yourbusiness.com.au email account

Please note this will only work if the email account you wish to be a default account is a licenced mailbox.

1 Open Outlook

2 Select File

3 Select Account Settings

4 Select Account Settings Again

In the dialogue box, you will notice your email accounts and the default mailbox is shown with the Tick next to it.

5 Select the mailbox you would like to set as the default mailbox.

6 Select the Set as Default option.

7 Select close.

8 Restart Outlook.

#Default, default account, Default Sender, Outlook
Like Dislike
7 views
Table Of Contents
How to Uninstall Outlook New

How to Uninstall Outlook New

Within Windows 11 Microsoft have updated their free email client from Windows Mail to Outlook New.

The Outlook new app looks very similar to Outlook Webmail and is heavily integrated with Microsoft Office 365. However, some of the great functionality that we are used to within the Outlook classic app has not been migrated like the ability to drag and drop emails between accounts (this may change in the future)


Right Click on the start menu and select System

Select Apps from the LHS menu

Select Installed apps

In the Search field type Outlook New

Select the 3 dots

Select Uninstall

Select Uninstall


This will remove the app from your system

#outlook new, remove, uninstall
Like Dislike
8 views
Table Of Contents
Copy-to-Clipboard Shortcut

Copy-to-Clipboard Shortcut

Easily copy and paste usernames and passwords without viewing details. Passportal uses the devices clipboard functionality, which means your copied item will remain in the clipboard until a new item is copied to it, or until the device is rebooted/restarted.

1 To copy an existing password or username, first navigate to the clients Credentials screen.

2 Select the 3 dots in the Actions column to the right of the password in the list.

3 Select either Copy Username or Copy Password.

A notification will display briefly to inform you the copy was successful.

Clicking on the Copy Username and Copy Password options will create an entry as a viewed password in the audit reports.

Like Dislike
16 views
Table Of Contents
Temporary Password Share
To share a Credential externally
Using the External Link

Temporary Password Share

On occasion it may be necessary to share a credential outside of Passportal. This can be done using a temporary share process in Passportal which creates an external link that can be shared with a trusted recipient. The recipient then uses the link to view an accessible location in Passportal to view the credential details.

Note: Where a credential is also configured to use TOTP, this information is not available to the recipient, so the Passportal Pro User and recipient must be in communication in order to share the TOTP code if and when required.

To share a Credential externally

1 Navigate to the credential to be shared.

2 Select the Actions menu.

3 Choose Create External Link.

4 Read the presented message and select to include the Credential notes field if needed by ticking the selection box, and then click Create Link.

5 The external link is generated, click Copy Link to copy it to the clipboard to then be pasted into the desired communications method (direct Slack chat, email, etc).

6 Click Close to close the dialog.

Using the External Link

1 Once the recipient has the link, and they visit the location, they will be presented with a message advising the link will expire in 3 days, or after the credential has been viewed once, and are directed to click a button to view the credential.

2 When the View Credential button is clicked, the recipient is shown the Credential details.

3 The recipient can use the copy to clipboard function to the right of the Username and Password in order to copy and paste as needed, or can use the eyeball button to view the Password in screen.

Once the page has been closed and then revisited, or if it is refreshed, it will now display message advising the link expiration.

#Password Share
Like Dislike
6 views
Table Of Contents
Disabling a Password
Re-activate a Password

Disabling a Password

It is only possible to Disable a credential. There is no option to fully delete one, as this will also remove all auditing information for the credential, therefore they can only be disabled.

Before disabling any credential where TOTP is configured, ensure that 2FA has been disabled in the 3rd party application or service BEFORE the Credential is disabled in Passportal

1 To disable a password, first navigate to the clients Credentials screen.

2 Select the 3 dots in the Actions column to the right of the password.

3

Select Disable.

4 Click Disable Item to confirm in the warning displayed, or click Cancel to exit without disabling.

You can also Disable using the option at the foot of the Edit Password screen. The same confirmation screen is displayed if the option is selected.

Re-activate a Password

Should you find that you need to re-activate a Password, this can be done from the Disabled Passwords view.

1 Toggle the Show Disabled slider to view disabled passwords.

2 Click the context menu to the right of the target password and select Activate Credential.

#Disabling, Disabling a Password, Re-activate, Re-activate a Password
Like Dislike
5 views
End User Guide
Temporary Password Share
Copy-to-Clipboard Shortcut
Viewing and Managing Passwords
TOTP (Time-based One-Time Passwords)
Editing a Password
Moving Passwords
Disabling a Password
Activate Your Account
Adding a Password
Creating Folders
Familiarise yourself with PassPortal
Install the Cross-Browser Extension (Optional)
Passportal Mobile App
Documents in the Passportal Mobile App
Adding a Folder or Credential
Change Your Settings
Navigating Around
Passportal Mobile App
Viewing and Editing Credentials
Cross-Browser Extension
Cross-Browser Extension – Using and Viewing Credentials
Cross-Browser Extension – Settings
Cross-Browser Extension – Password Generator
Features and Installation
Logging into the Cross Browser Extension
Cross-Browser Extension – Adding and Editing Credentials
Getting Started
Activate Your Account
Logging in to Passportal
Importing and Exporting Data
Exporting PassPortal Data to CSV
Importing and Exporting Data
  • Connections
  • Downloads
  • Followers
  • Following
  • HealthyPC Help Centre
    • PassPortal FAQ
  • Home
  • Knowledge Base
  • LoginPress
  • Logout
  • Member Directory
  • My Profile
    • Edit Profile
    • Login
    • Register
  • New Employee Forms
    • Aria Health Group
  • Website Design Questionnaire
HealthyPC – Knowledgebase